I procrastinated on this project for almost two years. I bought woven wood shades and wanted to line them before hanging them in my west facing family room. Sorry there is no before photo. I still had ugly mini-blinds from the builder.
Keep reading there is a how-to below.
First, let me ask...does anyone have any tips on how to photograph sunny windows? Anyone?.. Beuller?
The four windows are the only natural light in the room and the get sun all day hence, the need to line the shades.
The other issue was whether to mount them inside or hang them high and outside the window frame. Outside would have been ideal but the ceilings are 9 ft and the windows go nearly to the floor. I was unable to find any shades long enough so inside mount it had to be.
Here is the low down on how to line these. Lay the shade string side up and untie the strings. Pull the strings out of all of the loops but not out of the shade mechanism.
Cut your lining (I used blackout lining) to the width of your shade and hem or glue a 3/4 inch seam along each edge.
I used Fabri-tac glue and even though I am generally opposed to gluing fabric it really is the best way to attach the lining to the shade. The glue is acetone based so be careful what you get iton but it is also flexible when dry which is key for this project.
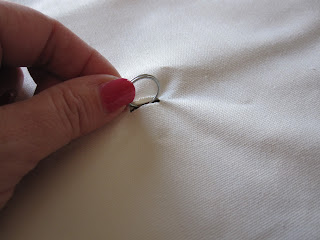
This is the tricky part to explain. You have to glue the fabric in sections cutting a small slit to pull the rings through.
I start with the bottom edge and about 8 inches along each side and carefully a small amount on the sold parts of the shade in the center. You don't want the glue to glob through.
Feel for the rings and carefully make a slit. Do NOT press down to cut as you might cut the strings holding the rings in place. It is more of a snag and pull motion that calls for a very sharp utility knife.
Carefully pull each ring through and continue gluing fabric to the next set of rings and repeat until you are at the top of the shade.
Make a hem along the top with the extra fabric and restring your shade.
Make sure to tie the ends on the last ring.
I might have procrastinated for a ridiculous amount of time but I was still lining the last shade and insisting that my husband get busy hanging those shades!


6 comments:
Fantastic! I love this, and would have used glue, too. I wish I knew how to photograph a window. I have struggled with that, too.
Ta Da! Fantastic and Finished! Great idea.
xo Nancy
Powellbrowerhome.com
Excellent job! Love your curtains too Kelly. :-)
Great job! You are much braver than I would be at attempting to do something like this. My biggest fear would be ruining the blackout lining trying to glue it to the shade and never mind about the slit for the rings! Ha
Congrats! I would never attempt this. Undoing the strings paralyzes me with fear. It's a great idea though - I had bamboo shades in my bfast nook and the evening sun went straight through the little slats and blinded anyone sitting opposite the window...
www.chattafabulous.blogspot.com
wow! looks great - and looks SO easy!
Post a Comment